

Imagine this: You shape a simple trinket dish on a Sunday afternoon, let it dry on the windowsill, and—after a little sanding and a glossy topcoat—it looks like it rolled out of a ceramics studio. No kiln, no wheel, no studio fees. Just air-dry clay, a few smart tricks, and the right finish.
If you’ve ever asked “How do I make air-dry clay look like ceramic?” or “Which sealer gives that glassy glaze?”, this is your friendly, step-by-step guide. We’ll cover the matte porcelain vibe, the high-gloss glazed look, and even a speckled stoneware finish—plus budget tips, safety notes, and project walk-throughs you can finish in a weekend.
What Makes Air-Dry Clay Look “Ceramic”? 🧪
Real ceramic is fired in a kiln, which vitrifies clay and bonds glazes into a durable shell. Air-dry clay doesn’t kiln-fire, so you recreate the look with surface prep and finishes:
- Sanding & Burnishing: Smooths fibers and seams so light reflects like a sealed surface.
- Priming: Fills tiny pores and prevents paint from soaking in patchy.
- Paint Systems: Matte acrylics for porcelain vibes; layered acrylics for stoneware; enamel or lacquer-style finishes for depth.
- Topcoats: Water-based polyurethane, acrylic gloss, or resin for that “glaze” shine. (Think “water-resistant,” not “pool-proof.”)
Reality check: Air-dry clay pieces are decorative. They’re not food-safe or oven/microwave/dishwasher safe. For vases, use a glass insert for water.
Tools & Supplies (Beginner-Friendly) 🧰
- Air-dry clay (white for easiest “porcelain” results)
- Craft knife or clay blade
- Small rolling pin / bottle, 2–3 mm thickness guides (coffee stir sticks work)
- Sandpaper: 220, 400, 800 (optional 1000–2000 for mirror gloss)
- Fine sponge sanding block
- Soft brush set & foam brush
- Primer (gesso or multi-surface primer)
- Acrylic paints (matte, satin, or metallic accents)
- Water-based polyurethane or acrylic varnish (matte/satin/gloss)
- Optional: UV resin or 2-part epoxy resin for glassy coats (decor only)
- Optional: Pigments or soft pastels for tinting clay
- Cotton cloth or metal spoon (for burnishing)
- Perfect-fit display: cork pads, felt feet, small glass bud-vase insert
Cost Breakdown (US-Friendly Budget) 💵
| Item | Budget Range (USD) | Notes |
|---|---|---|
| Air-dry clay (1–2 lb) | $7–$15 | White clay sands/paints cleanest |
| Primer (gesso) | $6–$12 | One bottle covers many projects |
| Acrylic paints | $1–$5 each | Matte white + neutral palette |
| Sandpaper pack | $5–$10 | 220/400/800 grits minimum |
| Water-based gloss varnish | $7–$14 | Gloss for “glazed” look |
| UV or 2-part resin (optional) | $12–$25 | High-gloss showpiece finish |
| Brushes & foam brush | $5–$12 | Keep one brush just for varnish |
| Cork/felt feet | $3–$6 | Protects shelves and trays |
| Glass insert (bud vase) | $3–$8 | Makes vases water-ready |
Pro tip: Start with varnish gloss (cheaper, easy clean-up). Save resin for special pieces.
Safety & Reality Checks ⚠️
- Decor use only. Air-dry clay is not food-safe or heat-proof.
- Water-resistant ≠ waterproof. Use glass inserts for flowers.
- Resin caution. Follow label directions (ventilation, gloves).
- Avoid constant humidity. Even sealed pieces can swell or craze with standing water.
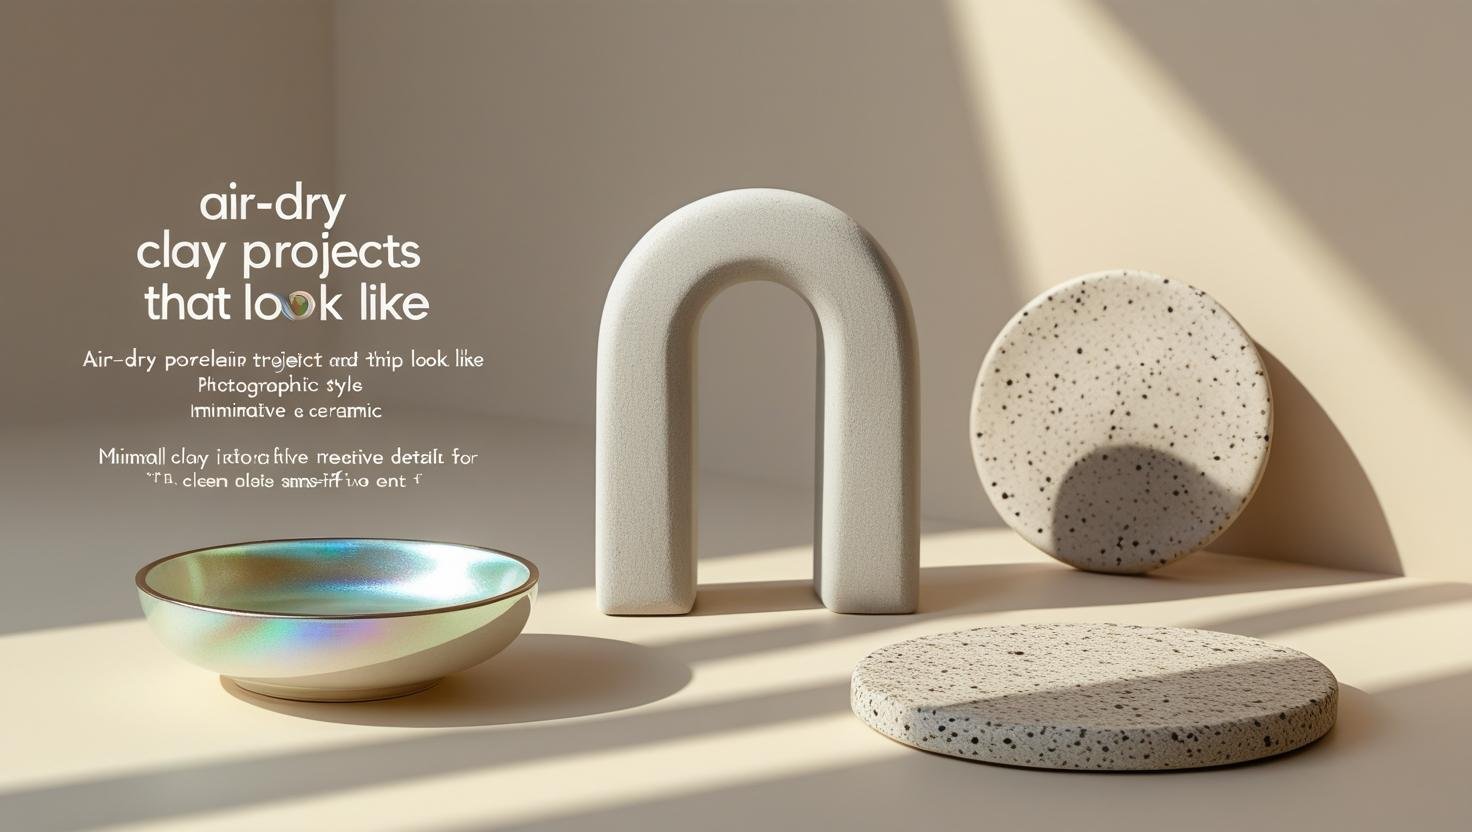
Core Finish #1: Porcelain-Matte Look 🧼
Best for: minimalist trays, ring dishes, sculptural beads, arch decor.
How to get it:
- Condition & Roll: Knead clay until smooth. Roll to ~3 mm using guides for even thickness.
- Shape: For a dish, cut a circle/oval; curve edges over a bowl or form until leather-hard.
- Dry Slowly: 24–48 h. Flip mid-dry to reduce warping.
- Sand: 220 grit to knock down seams, 400 to refine, 800 for velvety touch.
- Burnish (optional): Rub a spoon or polished stone lightly to compress fibers.
- Prime: Thin coat of gesso; let dry; micro-sand with 800.
- Paint: Matte white or pale porcelain tint (mix a drop of warm gray into white).
- Seal (matte or satin): 2–3 thin coats, light sand between if needed.
Porcelain palette idea: off-white body, barely-there warm gray rim, and a tiny gold accent drawn with a metallic pen.
Core Finish #2: High-Gloss “Glazed” Look ✨
Best for: trinket dishes, bud-vase sleeves (with glass insert), sculptural objects.
Steps:
- Prep as above through priming.
- Color-Coat: Smooth acrylic base in ceramic whites, buttery creams, or deep cobalt for that studio vibe. Let fully dry.
- Gloss Varnish: 2–4 thin coats, drying between; final pass with foam brush for a streak-free finish.
- Super Gloss Option: For showpieces, use UV resin or 2-part resin: thin pour, chase bubbles with a quick pass of warm air, cure as directed. Keep dust off while curing.
Glaze trick: For depth, layer satin under gloss. That under-sheen mimics kiln-glaze dimension.
Core Finish #3: Speckled “Stoneware” Effect 🌾
Best for: coasters, mugs-inspired decor (display), planters (no direct water), small bowls (non-food).
Mixes that work:
- Speckle Flick: Load a stiff brush with watered-down brown/black acrylic, then tap handle over your finger to flick micro specks over a matte oatmeal base.
- Pigment in Primer: Stir a pinch of pigment or pastel dust into gesso for a subtle, embedded speckle.
- Two-Tone Rim: Paint an unpainted rim edge in warm stone gray to mimic dipped glaze.
Seal with satin or soft gloss to get that kiln-like sheen.
Color Recipes That Scream “Ceramic” 🎨
- Porcelain White: titanium white + half-drop warm gray
- Mushroom Greige: raw umber + white + dash of black
- Cobalt Studio: ultramarine + touch of phthalo blue + white
- Celadon Mist: mint green + gray + a breath of white
- Terracotta Blush: burnt sienna + a whisper of red + white
7 Weekend Projects That Fool the Eye 🛠️
Trinket Dishes (porcelain matte) 🫶
Cut circles/ovals, slump over a small bowl to curve. Sand edges crisp; matte-seal for a boutique look. Add a pencil-thin gold rim for “fired” vibes.
Coiled Vase Sleeve (gloss glazed, glass insert) 🌿
Wrap coils around a glass cylinder (or build a sleeve measured to slide over a thin glass bud vase). Finish in creamy gloss; slide the glass inside for real flowers.
Scalloped Tray (speckled stoneware) 🌰
Cut a rounded rectangle; pinch scallops around the edge. Oatmeal base, micro-speckle flick, satin topcoat. Add felt feet.
Mini Arch Sculptures (porcelain) 🏛️
Roll a slab, cut arches in 3 sizes, stand with L-shaped supports behind. Sand to sculpture-smooth; finish matte for a gallery feel.
Bead Set + Pendant (gloss glaze) 📿
Roll beads, pierce with a skewer, dry on a stand. Sand seams, prime, paint deep color, gloss coat. Add metal findings.
Wall Relief Tile (two-tone stoneware) 🧱
Carve simple lines into a 10 × 10 cm tile. Oatmeal body, darker glaze-look inlines, satin top. Mount with Command strips.
Leaf Trinket Bowl (porcelain glaze) 🍃
Press a real leaf on rolled clay; cut around, curl edges. Paint white, dry brush the veins, then soft gloss for depth.
Drying, Cracks & Warping: Fixes That Actually Work 🧯
- Dry slowly on a flat, breathable surface; flip after 12–24 h.
- Cracks at edges? Fill with a paste of clay + a drop of water (or clay slip). Dry and re-sand.
- Warped tray? While still leather-hard, press gently between two flat cards with light books.
- Fuzzy surfaces? Burnish with a spoon before priming; it compresses fibers.
The Finishing System (Your Repeatable Routine) 🔁
- Shape → dry slowly, flip once.
- Sand 220 → 400 → 800.
- Burnish key areas (optional).
- Prime thin, dry, micro-sand.
- Paint in thin, even layers.
- Seal: matte/satin for porcelain/stoneware; gloss/resin for glaze.
- Cure fully before staging or packaging.
Tips, Tricks, Hacks & Local Secrets 🧠
- Microsanding Magic: A quick pass with 1000–2000 grit after the last paint coat makes gloss coats look deeper.
- Warm-Water Slip: A pea-size clay + a few drops of warm water → creamy filler for hairline cracks.
- Resin Dome Control: For resin gloss on small dishes, run a thin bead along the rim and “pull” toward center; surface tension keeps edges smooth.
- Dust-Free Cure Tent: Flip a clear storage bin over your piece while it cures. No lint, no bugs.
- Cork Feet First: Mark where feet go before sealing—adhesive sticks better to sealed surfaces when you lightly scuff spots first.
- Insert Strategy: For “vases,” always design around a removable glass insert. Looks ceramic, acts practical.
- Studio Look on a Budget: Layer satin under gloss for depth without pricey resin.
- Colorfast Whites: Add a drop of warm gray to white paint so it photographs as rich porcelain, not chalk.
FAQs (20+ Straight Answers, No Fluff)
Is air-dry clay food-safe after sealing?
No. Consider pieces decor only; don’t use for food or drink.
Can I make a water vase with air-dry clay?
Use a glass insert inside the clay sleeve. Sealing alone isn’t reliable.
Which sealer looks most like glaze?
High-gloss acrylic varnish is easiest. Resin gives the glassiest finish (for decor).
How do I prevent cracks?
Dry slowly, even thickness, flip mid-dry, and avoid heat or fans.
Why does my surface look fuzzy after paint?
You skipped fine sanding or burnishing. Sand up to 800–1000 grit.
Can I sand after sealing?
Lightly between coats. Final coat should be left pristine.
Matte vs satin vs gloss—when to use what?
Matte for porcelain, satin for stoneware, gloss for glaze looks.
What primer works best?
Gesso or a multi-surface primer; thin coats prevent texture.
How do I get crisp edges on dishes?
Sand the rim with a flat block; rotate the piece, not your wrist.
Can I add gold accents?
Yes—paint pen after the color coat, then seal lightly over it.
How long should I wait before sealing?
After paint is fully dry (often a few hours). Resin needs stricter cure times—follow label.
Why is my gloss streaky?
Too thick a coat or over-brushing. Use thin coats and a foam brush.
Do I need an expensive brand of clay?
No. A decent white air-dry clay + patient sanding beats premium clay with poor prep.
Can I mix pigments into the clay?
Yes—soft pastel dust or a tiny amount of acrylic can tint. Test first.
What about outdoor use?
Not recommended. Humidity and temperature swings can damage pieces.
How do I store finished pieces?
Cool, dry shelf; avoid damp bathrooms or sunny windows for long periods.
Can I repair a chipped edge later?
Patch with slip, sand, repaint, reseal. It may be slightly visible—call it “handmade charm.”
Best thickness for trays?
About 3 mm for small dishes; up to 5 mm for larger trays to resist warping.
What’s the cheapest way to get a glossy look?
Multiple thin coats of gloss varnish over a well-sanded, well-primed surface.
Why do my coasters stick to mugs?
Gloss can create suction. Use satin for coasters and add cork backs.
Can I gift these pieces?
Absolutely—include a care card: “Decor use only. Keep dry. Wipe with a damp cloth.”
Final Thoughts 💌
Air-dry clay is the most forgiving way to get ceramic-level aesthetics without a kiln. Prep patiently, finish wisely, and treat your creations as beautiful decor. With a weekend routine—sand, prime, paint, seal—you’ll turn simple slabs into gifts that look gallery-worthy and feel handcrafted in the best way.
