How to Organize a Charity Craft Marathon for Your Community
A charity craft marathon turns a group of makers into a small production line for a good cause. Ten people spending an afternoon on knot-tied blankets or handmade cards will produce far more than any one crafter working alone, and the event doubles as a way to build community around a shared purpose. This guide covers how to choose a cause, plan the logistics, and run the day without burning out.
What a craft marathon actually is
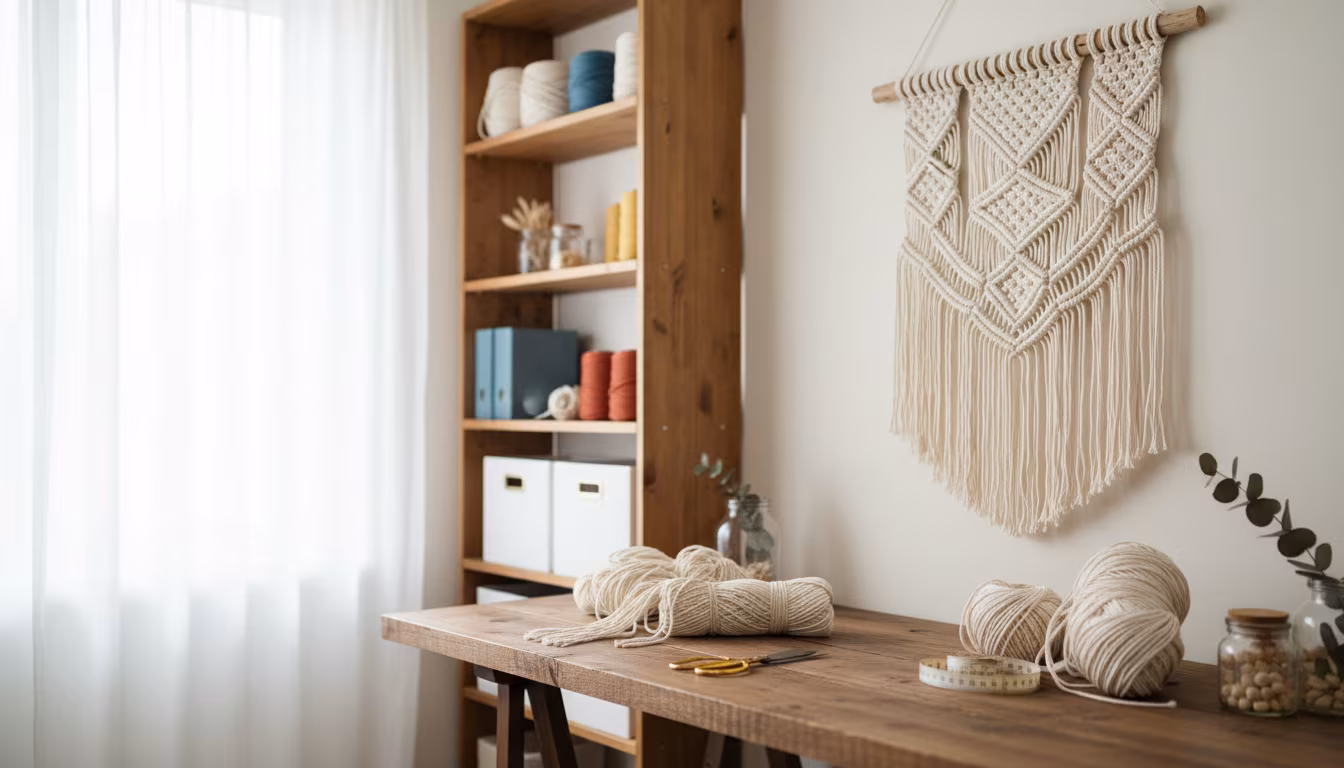
A charity craft marathon is a focused session, usually three to four hours, where a group gathers to make handmade items for a specific charitable organization. The format works best with a single, repeatable project that crafters of any skill level can pick up: no-sew fleece blankets, knitted hats, greeting cards, or simple sanded wooden toys. The point is volume and connection, not intricate individual pieces.
Define the cause and set a target
Pick an organization you genuinely care about, then call them before you plan anything. Do not assume what they need. Shelters, children's hospital wards, senior centers, and animal rescues all have different requirements, and some have restrictions on materials for safety or hygiene reasons. Ask directly what handmade items are useful right now and whether there are any rules about fabrics, fillings, or sizes.
Once you know the need, set a concrete, countable goal, such as "50 knitted hats for the local shelter by November 15." A number keeps the group focused and gives you something to celebrate at the end.
| Organization type | Handmade items often needed | Watch out for |
|---|---|---|
| Homeless shelter | Warm hats, scarves, fleece blankets | Machine-washable yarn only |
| Children's hospital | Greeting cards, small cloth toys | No loose buttons or small parts |
| Animal shelter | Chew-resistant toys, cage pads | Durable, non-fray fabric |
| Senior center | Lap blankets, fabric bookmarks | Non-slip backing appreciated |
The chew-resistant note comes from experience: a batch of soft pet toys once got turned away because the shelter needed tougher construction. One phone call would have caught it.
Ask about scale as well as type. A children's ward may only distribute a few dozen cards a month, so 200 at once will sit in storage, while a large shelter can absorb a hundred blankets in a single cold snap. Matching your target to what the organization can actually use keeps the finished pile from becoming a burden. It also helps to confirm the drop-off window: many charities take donations only on specific weekdays or need a day's notice, and knowing that before the event lets you schedule delivery instead of scrambling afterward.
Plan the supplies and the space
Choose a project that is simple and repeatable, and pre-cut as much as you can. For no-sew blankets, cut the fleece and mark the fringe lines in advance so participants only tie knots. For cards, set out stamps, cardstock, and adhesive at a stamping station and an assembly station.
Chase donated materials before you spend a cent. Local craft and fabric shops will often contribute for a cause, and thrift stores are a reliable source of cheap yarn and fabric; a $5 bag of scraps can become dozens of small projects. Overestimate your quantities and build in a buffer for mistakes; running out of yarn halfway through kills the momentum faster than anything else.
Estimate materials per finished item so you can shop precisely. A no-sew fleece blanket takes two 1.5-yard pieces of fleece; a simple knitted hat uses roughly 100 to 150 yards of worsted-weight yarn; a greeting card needs one sheet of cardstock plus an envelope. Multiply those figures by your goal, then add about 15 percent for cutting errors and restarts. Bringing a written per-item breakdown to a donation request also makes the ask concrete, which shops respond to better than a vague appeal for "any leftover yarn."
For the venue, look at community centers, church halls, or a cleared garage. Many spaces are free or reduced-rate for charity events. You need good lighting, tables, and enough room for your expected headcount. Check parking and wheelchair access before you commit. Weekends, especially a Saturday afternoon in a three-to-four-hour block, tend to draw the best turnout.
Recruit help and spread the word
Do not run this alone. This is volunteer work, so recruit a few reliable people and assign clear roles: a supply manager to keep stations stocked, an instruction lead to demonstrate the project, and a hospitality person for snacks and drinks. Even two dependable helpers take the pressure off and keep the day smooth.
Promote across every channel: local Facebook groups, community pages, and flyers at craft stores, coffee shops, and libraries. Being active on social media helps, but physical flyers reach people who never see your posts. In every message, state the cause, what you are making, the date, time, and place, what to bring, and, most important, that no experience is necessary. Post more than once: a week out, a few days out, and a last-call reminder the day before.
Run the event day
Set up stations before anyone arrives. Organize supplies by task so the workflow flows in one direction: for cards, a cutting station, a stamping station, and an assembly station; for blankets, a cutting station and a tying station. Print step-by-step instructions with pictures and place a finished example at each station so people can see the target.
Welcome everyone warmly and restate the cause in one sentence so the purpose stays front and center. Keep the atmosphere collaborative rather than silent; a playlist and simple refreshments (coffee, water, fruit, cookies) keep energy up over a few hours. Have your volunteers circulate to answer questions and restock. Snap photos throughout for thank-you messages later.
As the session winds down, collect finished items in one designated spot and count them; the total is the satisfying payoff of the day. Then schedule the drop-off with the charity, and deliver in person with a couple of volunteers if you can. Afterward, follow up with everyone who came, share the final count and a few photos, and name the impact plainly: "We made 75 blankets for the animal shelter." That acknowledgment is what makes people return for the next one.
Common mistakes to avoid
Overcomplicating the project. With mixed skill levels, an intricate craft leaves beginners frustrated. Choose something repetitive and forgiving with a low precision requirement, such as knotting, simple sewing, or card making.
Underbuying supplies. Always overestimate. Leftovers are easy to donate; running out stops the whole room.
Vague communication. Confusion about date, time, place, or what to bring means people arrive unprepared or not at all. Be specific and repeat the details.
Doing everything yourself. Delegate and let volunteers own their tasks. The goal is collective contribution, not solo perfection.
Provide a few extra pairs of common tools so no one waits: for paper crafts, keep spare quality scissors, glue sticks, and rulers on hand. If a bigger marathon feels daunting, start with a "crafting for a cause" evening of four or five friends in your living room; a small group still makes real items, and the run-through gives you the confidence to scale up next time.
Related Posts
Workbench Height Without Hurting Your Back After Two Hours
A workbench at the wrong height becomes painful before the project is done. The elbow rule...
Single-Bay Garage Workshop Layout Without Losing the Car
Park the car and still keep a real workshop: mobile tools on locking casters, perimeter wall...

Pegboard vs French Cleat: The Honest Tool Wall Choice
Pegboard holds ~50 lb per sheet and rearranges instantly; French cleat holds 100+ lb per rail...

The Complete Guide to Starting a Fiber Arts Guild in Your Town
A practical plan to start a local fiber arts guild: finding founding members, picking a venue...