Miniature Painting Starter Kit: Brushes, Primers, Paints 🎨
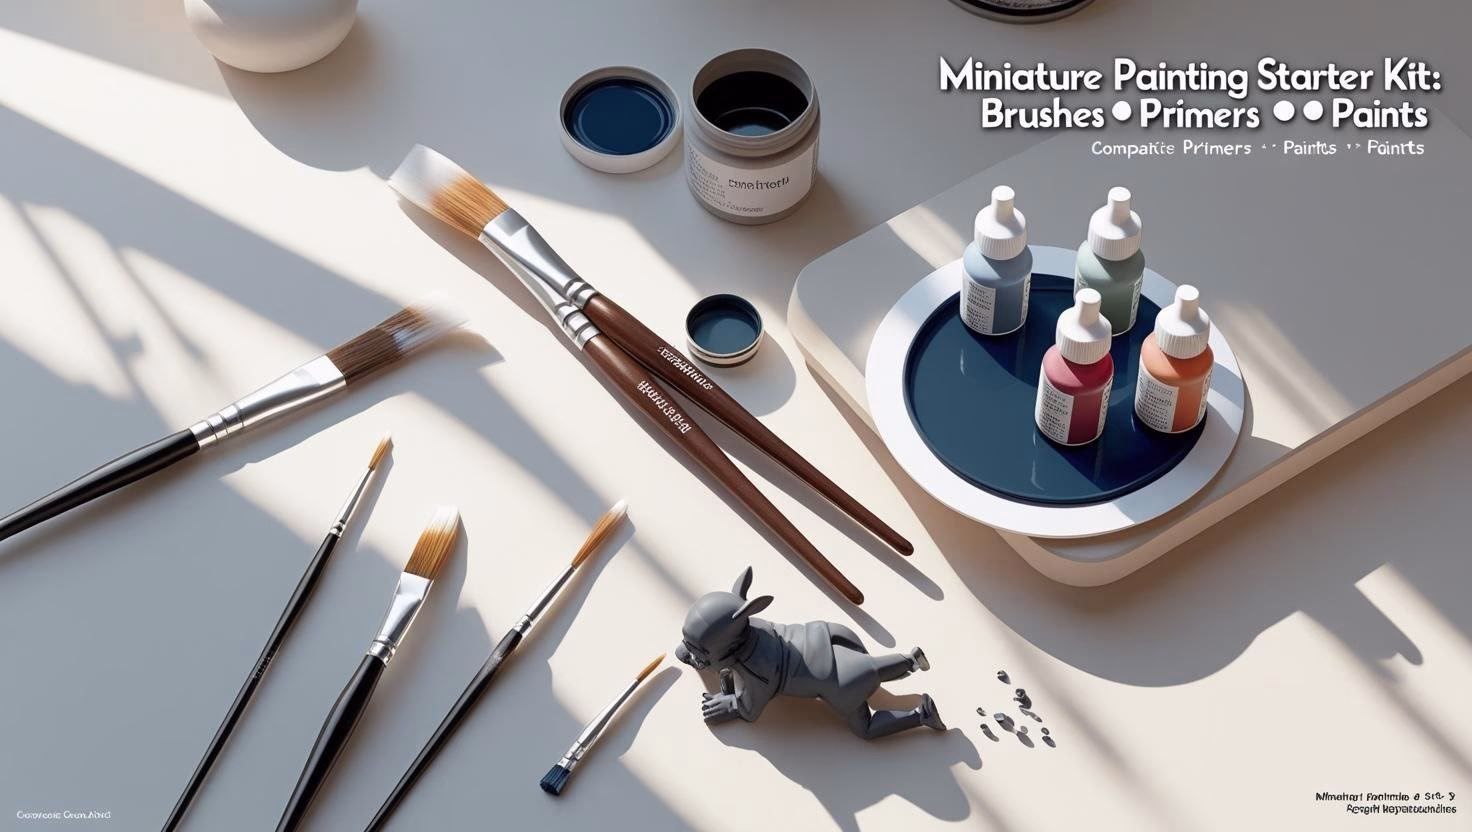
Painting tabletop miniatures well does not require an airbrush, a studio, or fifty paints. A tight starter kit, a few brushes, the right primer, a limited palette of acrylics, and a couple of workflow habits, is enough to take a model from bare grey plastic to a clean, game-ready finish. This guide covers the brush sizes that matter, the primers that behave, the colors that cover almost any scheme, and the core techniques that do the heavy lifting.
Miniature painting sits alongside the broader hobby of collecting and building gaming miniatures, and most of the paint itself is standard acrylic paint formulated fine enough for small detail. Everything below is beginner-friendly but built to give results you will actually be happy to field.
What a starter kit actually needs
Keep the initial buy short. Three brushes, one primer, a core set of paints, and a handful of prep items will carry you through your first squad:
- Brush trio: a base/layer brush (size 1–2), a detail brush (00–0), and a small or medium drybrush.
- Primer: a rattle-can in black, grey, or white, or a brush-on primer if you paint indoors.
- Acrylic paints: a tight palette of black, white, warm brown, cool brown, red, yellow, blue, a skin tone, silver, and gold, plus a dark wash and matte varnish.
- Wet palette: keeps thinned paint workable for hours; store-bought or a DIY version in a food container.
- Prep and cleanup: a hobby knife, a mold-line scraper, a 400–800 grit sanding sponge, dish soap, and an old toothbrush.
- Setup: a table cover, a water cup, paper towels, and a daylight lamp around 5000K.
Airbrushes, specialty mediums, and a wider range of shades can wait. None of them are needed to start strong.
Brushes: sizes and care
Three brushes cover the essential jobs. A base/layer brush in size 1 or 2 carries enough paint to cover a panel in a smooth pass while still holding a fine point, and a size 2 often paints cleaner than beginners expect because it holds steadier, thinner paint. A detail brush in 00 or 0 handles eyes, rivets, and trim; going smaller than 00 mostly means a tip that dries out mid-stroke. A stiff drybrush, oval or flat, is your shortcut to fast texture on hair, fur, chainmail, and stone.
Synthetic brushes (nylon or PBT) are cheap, tough, and ideal for basecoats and drybrushing. Natural sable, including Kolinsky, offers better tip control and paint flow for layering and glazing but costs more and needs gentler care. A sensible start is synthetic base and drybrush plus one sable detail brush added when you want smoother blends. Whatever you buy, protect it: rinse often, never let paint dry in the metal ferrule, roll the tip on a damp palette edge to keep a point, and wash with brush soap at the end of each session before reshaping and drying flat. Reserve one older brush for abrasive metallics and another for varnish. The core habit that saves brushes: load only the first third of the bristles, so the belly holds moisture rather than pigment.
Primer: color and application
Primer gives paint something to grip; skip it and acrylics rub off the moment a model changes hands. Choose the color to suit your scheme. Black hides missed spots and suits metallics and dark armies; grey is the balanced, detail-showing default; white or ivory boosts bright colors and speed paints.
Rattle-cans cover fastest, sprayed in light passes from 8 to 12 inches away, ideally at 65–75°F in low humidity. Brush-on primer works in any weather and any apartment, thinned slightly with water so it self-levels. An optional zenithal method, priming black then misting white from above at a 45–60 degree angle, pre-shades the model so colors read with fewer coats. To avoid the chalky white bloom called frosting, shake the can 60 to 90 seconds, test-spray on cardboard first, keep both can and model warm, use thin passes, and never spray in high humidity.
A tight starter palette
A dozen well-chosen colors cover roughly ninety percent of armies and characters. Work from dropper bottles, which waste less and make thinning easier, and thin each paint with a little water or acrylic medium to a milk-like consistency, thin enough to flow, thick enough to cover.
- Neutrals: matte black, titanium white, dark grey.
- Skin: a fair-to-medium skin tone, mixed with brown for shadows.
- Earths: a warm brown for leather and wood, a cool brown for mud and shadow.
- Primaries: true red, a sunny yellow, a deep blue.
- Metallics: steel or silver, and an antique gold.
- Wash and varnish: a dark brown or black wash for panel lines, plus matte varnish (with satin on hand for leather and armor).
Speed or contrast paints are a strong add-on: over a zenithal undercoat they base, shade, and hint at a highlight in one pass. Start with true metallics for sparkle and explore non-metallic techniques later once the basics feel automatic.
Core techniques
Four moves produce a clean tabletop model, and they build in order. Basecoat with paint thinned to milk consistency, two thin coats rather than one thick one, pulling strokes in a single direction. Wash next: flood a dark wash into the recesses and let gravity pool it in the crevices, wicking away any puddles on flat areas with a clean damp brush so you avoid tide-marks. Drybrush third: wipe most of the paint off the brush onto a towel, then feather a lighter tone across raised texture to catch edges instantly. Finish with edge highlights, applied with the side of the brush rather than the tip, hitting only the sharpest raised lines with a lighter tone (on black armor, work up through dark grey to light grey). Once fully cured after about 24 hours, seal the model with matte varnish, adding a touch of satin on blades and trim so metal keeps some life. A fast repeatable order, prime, block colors, all-over wash, drybrush, edge highlight, spot details like eyes and gems, then varnish, finishes a whole squad far quicker than painting one model to completion at a time.
Kit loadouts and cost
Budgets scale cleanly from a first-squad kit to a fully stocked bench. The breakdown below shows what each tier includes and roughly what to expect to spend.
| Kit | What's inside | Approx. cost (USD) |
|---|---|---|
| Budget | Synthetic base #2, synthetic detail 0, small drybrush; brush-on primer; 10 core dropper paints; dark wash; matte varnish; DIY wet palette | $55–75 |
| Balanced | Synthetic base #2, sable detail 00, medium drybrush; two primer colors (rattle plus brush-on); 14–16 paints including metallics and a skin set; wash; matte and satin varnish; compact wet palette | $95–140 |
| Premium starter | Sable base #2, sable detail 00, quality drybrush; three primer colors; 20+ paints including speed paints; mediums; matte and satin varnish; pro wet palette; brush soap | $160–240 |
Spend where it counts. Better light and good primer improve results more than a seventeenth shade of red ever will.
Common problems and fixes
Most beginner frustrations have simple causes. Chalky, streaky paint usually means over-thinning with plain water, add a drop of medium or use fewer, thinner layers. Streaky metallics lay smoother over a light gloss undercoat with two thin coats. Frosted primer comes from cold, humid, or heavy spraying; strip it gently with isopropyl alcohol and a toothbrush, then reprime warm and thin. Fuzzy basecoat edges often clear up just by switching to a size 2 brush that carries smoother paint. A model that stays shiny after matte varnish was likely coated too heavily or in humid air; recoat with light passes in drier conditions.
Put it together on a single test model before committing to a squad. Prime it grey, block in the main colors, hit it with one all-over wash, drybrush the edges, add a couple of spot highlights, and varnish it. That one model teaches the rhythm of the four core techniques, and once it clicks, a full unit painted to a clean tabletop standard is a weekend's work rather than a months-long project.
Related Posts
Beginner Cricut Blade Set: What You Actually Use Daily
The Cricut starter blade list is longer than most beginners need. The two or three blades that...
Painter's Tape for Crisp Lines on Textured Wall Surfaces
Standard blue tape bleeds on textured walls. The specialty tapes, caulk-edge-seal step, and...
Hot Glue Sticks Compared: Low-Temp, High-Temp, Specialty
Low-temp glue sticks melt near 250°F, high-temp near 380°F. Compare stick types, specialty...

Sandpaper Grits Demystified: When to Stop Going Finer
Sand 80 to 120 to 180 for film finishes, 220 for oil, and stop there: finer burnishes wood and...