The Complete Guide to Starting a Local Quilting Bee Group
The Complete Guide to Starting a Local Quilting Bee Group
Hey there, fellow makers! You know that feeling when you're deep into a craft project, maybe surrounded by fabric scraps or sawdust, and a thought pops into your head: "I wish I had someone to share this with." Or maybe you're stuck on a tricky step, and Google just isn't giving you the exact answer you need.
I totally get it. My crafting journey started pretty solitary. It's awesome to lose yourself in a project, but sometimes, a little connection makes all the difference. Today, we're diving into something that can transform your crafting life: starting your very own local quilting bee group.
Why This Actually Matters
For a long time, my workshop felt like a creative island. I'd spend hours on woodworking projects or elaborate paper crafts, then share photos online. That's great, but it's not the same as having someone right there, giving you a high-five when you finally nail that perfect seam, or offering a fresh perspective when you're staring at a wonky block.
I remember trying to piece together my first complicated quilt top, a real beast with tiny triangles. I was ready to throw it all in the scrap bin. If I'd had a quilting bee back then, someone could have shown me a simple trick with starch and pressing, saving me hours of frustration and probably some tears.
This isn't just about quilting. It’s about building a community, sharing skills, and getting that real-time feedback and encouragement that online forums, as cool as they are, can't always provide. Plus, think of all the shared fabric stashes and thrift store haul bragging rights!
You'll learn new techniques, get inspired by other people's projects, and maybe even tackle those massive quilts you've been dreaming about, knowing you've got a supportive crew. It's also a fantastic way to connect with folks who share your passion, right in your neighborhood.
What Exactly is a Quilting Bee? the Basics
Alright, so what are we even talking about here? A quilting bee is basically a gathering of people who love to quilt, where they meet up regularly to work on projects, share ideas, learn from each other, and just enjoy some creative camaraderie. It's really that simple at its core.
Historically, quilting bees were all about collaboration. Folks would literally "bee" together to help one person finish a quilt, especially for big events like weddings or moving into a new home. One person might piece the top, another might quilt it, and everyone would chip in on the binding.
Today, they're often more about shared individual projects. You might bring your own quilt-in-progress to work on, or the group might decide to collaborate on a single charity quilt. The beauty is you get to define what your bee looks like. There's no single "right" way to do it.
What Kinds of Quilters and Projects Fit In?
You might be wondering if your skill level is "enough" or if your preferred quilting style fits. The honest answer? Absolutely, yes! A good quilting bee embraces everyone, from absolute beginners who are just learning to thread their machine, to seasoned pros who've been quilting for decades.
My first experience with a craft group was actually for paper crafts, and I was so nervous. I thought everyone would be making these intricate pop-up cards while I was still folding construction paper. But everyone was just genuinely excited to share what they knew. It was such a relief.
For quilting, you could have someone hand-piecing tiny hexagons next to someone machine-quilting a king-size bedspread. Some bees focus on traditional block patterns, others on modern art quilts, and some are just happy to see whatever fabric magic you're cooking up.
- Beginners welcome! Seriously, don't let a lack of experience hold you back. Bees are amazing places to learn new skills, get tips, and troubleshoot. I learned so much about fabric grain just by watching someone else press their seams.
- Any quilting style. Whether you love traditional Log Cabin blocks, modern improv designs, art quilts, or utility quilts, there's a place for you. The variety of styles often sparks new ideas for everyone.
- Individual or group projects. Most bees let you work on your own project. Some groups also pick a group project for charity or a challenge. It's great to have both options.
- Non-quilting fiber artists too. Don't limit yourselves! Maybe someone who does appliqué or embroidery would love to join. It's all fabric art, and the cross-pollination of ideas can be amazing.
What Supplies Should I Expect to Bring or Share?
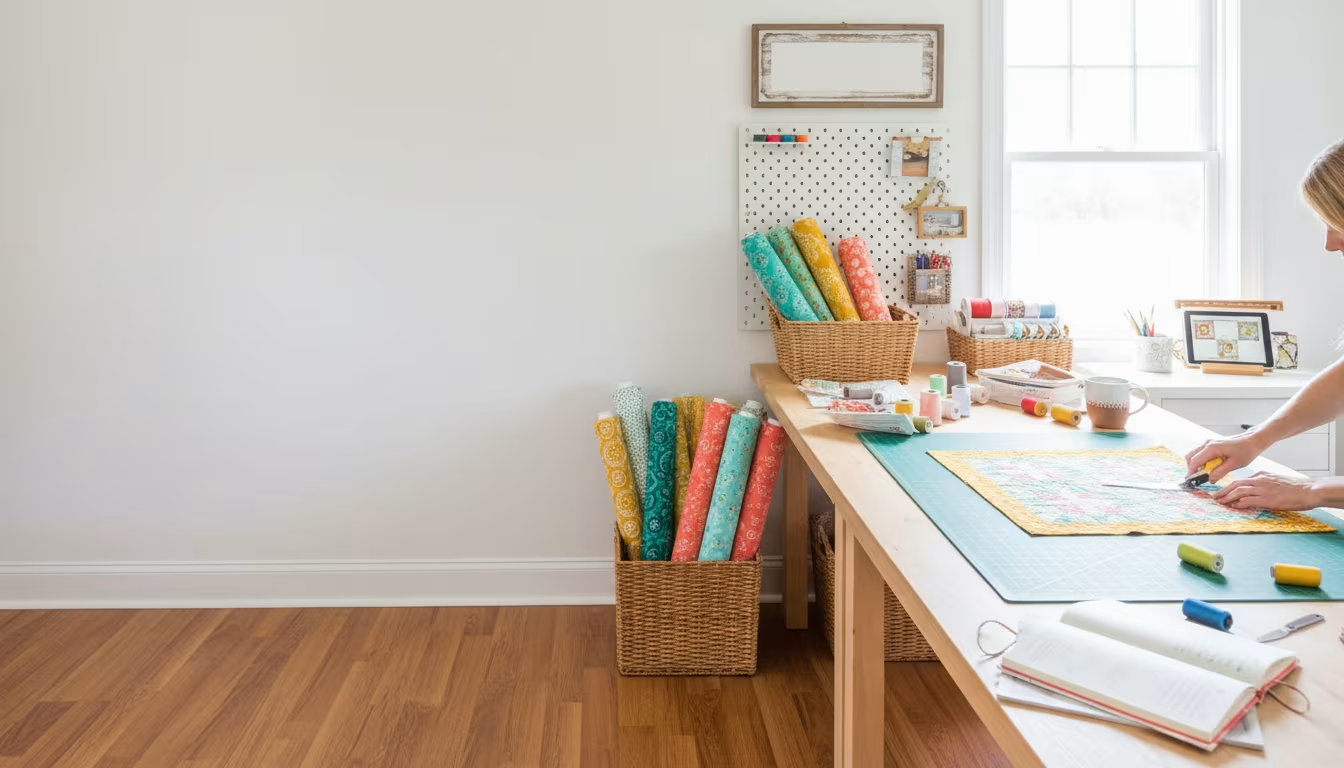
This is a big question, especially if you're picturing everyone lugging their massive sewing machines around. For a small, informal bee, it might just be your current project, a needle, thread, and maybe a small cutting mat and rotary cutter if you're doing piecing.
For a slightly more organized group, especially if you're meeting in a shared space like a community center, you might want to coordinate. Shared tools can be a huge help and cut down on everyone's hauling burden.
My own craft groups usually involve a mix. Everyone brings their personal project kit, but someone often volunteers to bring a shared iron and ironing board, which is a total lifesaver. No one wants to iron on their lap!
- Personal project bag: This usually includes your fabric, pattern, scissors, thread, seam ripper (we all need one!), pins, and whatever notions your current project requires. Don't forget your fabric scraps for "show and tell."
- Sewing machine (optional): If you're planning to machine quilt, you'll need your machine. Many bees meet at places where machines can be set up, or members take turns hosting where there's space. Sometimes, a bee is just for hand-sewing!
- Cutting tools: A small cutting mat, rotary cutter, and a few rulers are super helpful for piecing. You might decide to have one or two shared large cutting stations if you have the space.
- Ironing station: This is a big one. One or two irons and small ironing boards or pressing mats are invaluable. It's much easier to share these than have everyone bring their own.
- Snacks and drinks: While not technically "quilting supplies," a good potluck snack rotation keeps the energy up and the conversations flowing. My paper craft group always has amazing cookies.
How to Actually do It: Starting Your Bee
Okay, you're convinced! This sounds like a blast. But how do you actually take it from a fun idea to a real, functioning group? It might feel a little daunting to be the one to kick it off, but trust me, it's totally doable. Just remember my rule: start small, experiment, and don't be afraid if it's not perfect on the first try.
Think of it like designing a quilt block. You pick your fabrics, cut your pieces, and then you start stitching. Sometimes you have to un-stitch a few seams, but eventually, you get a beautiful block. Your bee will be the same way.
Step 1: Define Your Vision (what Kind of Bee?)
Before you even think about inviting people, take a few minutes to jot down what kind of quilting bee you're dreaming of. This isn't about setting rigid rules, but more about having a clear idea in your head that you can share with potential members.
Are you looking for a super casual "come as you are" group? Or something more structured with specific project goals? Knowing this will help you attract like-minded individuals and manage expectations from the get-go. I once tried to start a formal "critique" group for art, and it fizzled because everyone just wanted to chat. Learn from my mistakes!
- Casual vs. Structured: Decide if you want a relaxed social gathering where people work on their own projects, or if you'd like a more formal group with planned activities, lessons, or charity projects.
- Focus: Will it be a modern quilting bee? Traditional? All skill levels? Hand-quilting only? This helps set the tone.
- Frequency: How often do you want to meet? Weekly, bi-weekly, monthly? Consider your own schedule and what feels sustainable.
- Location preference: Do you want to host? Or are you looking for a public space? Thinking about this early can guide your search for members and venues.
- Size: Are you looking for a small, intimate group of 3-5 people, or a larger gathering? A smaller group is often easier to start and manage.
Step 2: Find Your First Few Members
This is where the rubber meets the road. You can't have a bee without the bees! Don't feel like you need a huge crowd right away. Starting with just two or three other people is fantastic. A small group is much easier to get off the ground.
I found my first woodworking buddy at a local lumberyard, just by striking up a conversation. You'd be surprised where you can find fellow enthusiasts once you start looking. Be open and ready to share your idea with anyone who seems interested.
- Local Quilt Shops: This is probably the number one spot. Many shops have bulletin boards where you can post a "Quilting Bee Forming" notice. Talk to the staff too; they often know who's looking for a group.
- Community Centers & Libraries: Check their bulletin boards or ask if they have a craft group liaison. Sometimes they even have meeting rooms you can reserve.
- Online Local Groups: Facebook groups for your town or county, Nextdoor, or even local craft forums are great places to cast a wider net. Post a friendly message explaining what you're hoping to start.
- Friends & Family: You might be surprised who in your existing circle quilts or wants to learn! Mention your idea to everyone.
- Word of Mouth: Once you find one or two people, they often know others who might be interested. It grows organically.
Step 3: Pick a Meeting Spot
The "where" is just as important as the "who." The ideal spot will depend on the size of your group, whether you'll be using sewing machines, and what kind of vibe you're going for. Don't stress too much about finding the "perfect" place right away.
My first craft group met at a coffee shop, which was great for conversation but terrible for actual cutting fabric. We quickly moved to someone's dining room. It's all about figuring out what works for your group over time.
- Your Home: Pros: Free, comfortable, easy access to your supplies. Cons: Might feel like a lot of hosting pressure, limited space, can get messy. Best for smaller, intimate groups (2-5 people).
- Members' Homes (Rotating): Pros: Spreads out the hosting duties, offers variety. Cons: Each person needs to have adequate space, might require more coordination. Great for groups once they're established.
- Local Library or Community Center: Pros: Often free or low-cost, public, neutral territory, dedicated meeting space. Cons: Booking might be required, limited hours, less personal. Excellent for larger or more formal groups.
- Local Quilt Shop or Fabric Store: Pros: Inspiring environment, often have dedicated classrooms. Cons: May charge a fee, limited availability. Ask if they offer discounts or free space for bees.
- Coffee Shop or Cafe: Pros: Casual, good for initial meetups or hand-sewing groups. Cons: Limited table space, can be noisy, hard for machine work. Best for social-first, project-second groups.
Step 4: Set the First Meeting Agenda
The very first meeting should be relaxed and focused on getting to know each other. Don't try to plan a marathon quilting session or decide on the next five years of projects. Think "icebreaker" and "brainstorm."
I remember my first time meeting up with a new craft group. The organizer just brought some cookies and asked everyone to share what they were working on. It instantly put me at ease. Keep it simple and allow for plenty of natural conversation.
- Welcome and Introductions: Have everyone say their name, what kind of quilting they love, and one project they're excited about (or struggling with!).
- Show and Tell: Encourage everyone to bring one or two of their favorite quilts or a work-in-progress. This is a fantastic way to spark conversation and get inspired.
- Discuss Group Goals: This is your chance to share your initial vision from Step 1, but then open it up for discussion. Ask what everyone else hopes to get out of the bee.
- Brainstorm Logistics: Talk about future meeting frequency, potential locations, and any "loose rules" you might want to establish. Don't make anything final yet; just get ideas flowing.
- Light Crafting (Optional): If people brought projects, give them some time to work on them. This creates a natural buzz and allows for organic sharing of tips.
- Snack Time: Crucial for any good gathering! Maybe ask everyone to bring something small to share for the first meeting.
Step 5: Establish Some Loose "rules" (guidelines)
No one wants to join a group with a list of rigid rules, but having some basic guidelines can prevent misunderstandings and ensure everyone has a good experience. Think of these as guardrails, not roadblocks. It's all about making sure everyone feels comfortable and respected.
My first attempts at running a group were either too strict or too chaotic. Finding that middle ground of "we're all friends here, but let's be considerate" is the sweet spot. We once had a group member who always showed up late and expected everyone to stop and catch them up. A simple "we'll start promptly at X time" guideline would have saved some awkwardness.
- Attendance & Communication: Encourage members to RSVP or let the host know if they can't make it. This is just common courtesy for planning.
- Sharing & Respect: Remind everyone to be respectful of different skill levels and styles. Encourage sharing tips and tools, but always ask before borrowing.
- Project Focus: Decide if the bee is for individual projects, group projects, or a mix. This helps manage expectations about what gets done during meeting time.
- Hosting Rotation: If meeting at homes, discuss how hosting duties will be shared. Maybe someone hosts for three months, then another person takes over.
- Snacks/Refreshments: Will it be a potluck? Will the host provide? Will everyone just bring their own? A simple agreement prevents awkward moments.
- Clean-up: A quick chat about helping the host clean up at the end of the session goes a long way. Many hands make light work, especially with fabric scraps!
Step 6: Gather Essential Supplies for Group Use
Once you have your core group, you can discuss what shared tools would be most beneficial. Not everyone needs to own a giant cutting mat, and having one or two shared ironing stations can really make a difference for productivity and comfort during a bee meeting.
We actually chipped in for a big cutting mat for my paper craft group, and it was the best decision. No more awkward little mats trying to cut large pieces of cardstock. It made everyone feel more invested too.
- Cutting Station: A large cutting mat (24"x36" or larger) and a few long rulers (like 6"x24") are fantastic to have for general use. Members can bring their own rotary cutters.
- Pressing Station: An ironing board (or two) and a couple of irons are invaluable. This avoids everyone waiting for one small travel iron.
- Design Wall (Optional): If you have space, a portable design wall (even just a flannel sheet tacked to a wall) is great for laying out blocks together.
- Reference Books/Magazines: Encourage members to bring their quilting books or magazines to share. It's like having a mini-library at your fingertips.
- First Aid Kit: You're working with needles and rotary cutters! A small kit with bandaids is a smart idea.
- Coffee Maker/Tea Kettle: A shared way to make hot beverages definitely adds to the cozy, social atmosphere.
Step 7: Keep the Momentum Going
A bee isn't just a one-time thing; it's an ongoing community. Once you've had a few successful meetups, think about how to keep the energy and excitement high. Regular communication and varied activities can help prevent the group from fizzling out.
My biggest lesson in group organizing is that consistency matters. Even if you just send a quick text reminder the day before a meeting, it makes a difference. People appreciate knowing what's happening.
- Regular Communication: Set up a group chat (text, WhatsApp, email list) to share updates, reminders, and photos of finished projects.
- Diverse Activities: Don't just do the same thing every time. Alternate between individual work days, group charity projects, technique-sharing sessions, or even field trips to quilt shows.
- "Challenge" Projects: Occasionally propose a fun, low-pressure challenge, like "make a mini quilt using only scraps" or "try a new block pattern."
- "Show and Tell" is Key: Always leave time for members to show off their progress, ask for advice, or celebrate a finished piece. It's incredibly motivating.
- Seek Feedback: Every few months, check in with the group. Ask what's working, what could be improved, or if anyone has ideas for new activities.
- Social Outings: Plan a non-quilting social gathering sometimes, like going out for coffee or lunch. It strengthens the bonds beyond just the craft.
Making It Stick / Common Mistakes
Starting something new is always a learning curve. I've definitely messed up plenty of times trying to get my craft groups just right. The good news is, most people are pretty understanding, especially when you're all there for the same reason: to make cool stuff and hang out.
One common mistake I see is trying to be too much too fast. You don't need to be a perfectly structured organization on day one. Allow for some organic growth and flexibility. It's a bee, not a corporation!
"The best quilting bees aren't built on perfect stitches, but on shared laughter and salvaged seams."
Mistake 1: Being Too Rigid with Rules
Solution: Start with minimal guidelines and let the group evolve. If an issue comes up, address it then, rather than trying to anticipate every potential problem with a rulebook. Flexibility is key in the beginning.
I learned this the hard way trying to implement a "no talking about non-craft topics" rule once. It completely stifled the natural social flow. People want to connect, not just be silent quilting robots.
Mistake 2: Taking on All the Responsibility Yourself
Solution: Delegate! As the initiator, you might feel like you have to do everything. But a healthy group shares the load. Ask for volunteers to host, bring snacks, or organize a mini-lesson. Most people are happy to help.
When I started asking for help, I realized everyone was eager to contribute. I just needed to ask. It made the group feel more like "ours" instead of "mine."
Mistake 3: Letting It Fizzle out with Inconsistent Meetings
Solution: Set a realistic schedule and stick to it as much as possible. Even if only a few people can make it sometimes, having that consistent date helps maintain momentum. Life happens, but a predictable schedule is a backbone.
We had a group that met "whenever." We barely met! Once we put it on the calendar for the first Tuesday of every month, it became a regular thing people planned around.
Mistake 4: Not Addressing Group Dynamics or Conflict
Solution: This is the tricky one, right? If different personalities clash or expectations aren't aligned, address it gently and directly. Encourage open communication and remind everyone of the bee's shared goal: friendship and quilting joy.
Sometimes it's just about clarifying expectations. If someone wants to use the bee as a free sewing lesson, but everyone else wants social time, you'll need to talk about it openly. It's okay if not everyone is a perfect fit, but honesty helps.
Mistake 5: Focusing Too Much on Perfection
Solution: Remind everyone (and yourself!) that a quilting bee is for learning, experimenting, and having fun, not for flawless execution every time. Embrace the "perfectly imperfect" nature of handmade items. Mistakes are how we learn!
I constantly remind myself that even my favorite quilts have "character." The point is the process, the learning, and the stories behind the stitches. Not just a showpiece.
Frequently Asked Questions
Do I Need to be an Expert Quilter to Join or Start a Bee?
Absolutely not! Most quilting bees are incredibly welcoming to all skill levels. In fact, starting one as a beginner can be fantastic because you'll learn so much from the collective knowledge of the group. Don't let imposter syndrome stop you.
I think the best groups have a mix of experience. The seasoned quilters get to share their wisdom, and the beginners bring fresh perspectives and energy. It’s a win-win for everyone involved.
How Many People Should I Start With?
I'd say aim for a core of 3 to 5 people for your first few meetings. It's much easier to coordinate schedules and find a comfortable meeting space with a smaller group. You can always grow from there once you've found your rhythm.
Don't wait for 10 people to show up to officially kick things off. Even just you and one or two other keen quilters can form a fantastic, productive bee. Small and mighty is often the best way to start.
What if Nobody Shows up to the First Meeting?
That feeling of planning something and having no one show up is truly the worst. It’s happened to me, and it stings. But don't let it discourage you too much!
If you've cast a wide net and still get no interest, it might be worth trying a different approach or location. Maybe change your initial offering – instead of a "bee," try a "casual fabric swap and coffee" to gauge interest. Or, sometimes, it just takes a bit longer for word to spread and for people to commit. Keep trying!
Should We have Specific Projects or Free-form?
This is something to discuss as a group, but I'd suggest starting with a free-form approach where everyone works on their own projects. It takes the pressure off and lets people ease into the group dynamic.
Once you've met a few times and get a feel for everyone's interests, you can suggest optional group projects or challenges. That way, you know it's something people genuinely want to do together, rather than feeling obligated.
Is It Okay if I'm Shy?
Totally! Many crafters are introverts, and that's perfectly fine. A quilting bee isn't about being the loudest person in the room. It's about shared passion.
You can let the organizer know you're a bit shy if you feel comfortable. Just being present and working on your project is enough. Over time, as you get to know people, you'll likely feel more comfortable opening up. The shared activity provides a natural conversation starter, which is perfect for shyer folks.
How Long does This Take to Set Up?
From deciding you want to start a bee to having your first meeting, it could realistically take anywhere from two weeks to a couple of months. It really depends on how quickly you can find interested members and coordinate schedules.
Don't rush it. Take your time with each step, especially finding those first few members. A solid foundation will make your bee much more enjoyable and sustainable in the long run. My own craft group took about a month to get our first 3 people together, and it felt just right. 👋
Is This Worth It for Someone Who Only Quilts Occasionally?
Absolutely! A quilting bee can be especially valuable for occasional quilters. It provides motivation to get those projects off the shelf, offers a dedicated time to work on them, and gives you access to advice when you hit those inevitable snags.
I know I'm way more likely to finish a project if I know I'm meeting up with people who are doing the same. It creates a gentle accountability that can be really helpful, even if you only quilt once a month. Plus, it's just plain fun to share your creations!
The Bottom Line
Starting a quilting bee might seem like a big undertaking, but it’s truly one of the most rewarding things you can do for your craft and your community. You’ll gain skills, make friends, and probably finish more quilts than you ever thought possible.
Don't overthink it, and don't strive for perfection from day one. Just take that first step, invite a few fellow fabric lovers, and let the magic unfold. Happy quilting! ❤️
Related Posts

Pegboard vs French Cleat: The Honest Tool Wall Choice
A blunt comparison of pegboard and French cleat for shop tool walls — weight, customisation, cost...

The Complete Guide to Starting a Fiber Arts Guild in Your Town
Dreaming of a local hub for knitters, crocheters, weavers, and more? Starting a fiber arts guild ...
Why Tool Libraries Let You Try Expensive Hobbies Before Committing
Dreaming of diving into woodworking or pottery but worried about the cost of specialized tools? T...

How to Plan a Nature Journaling Walk and Sketch Workshop
Ready to blend your love for nature with your creative spirit? Learn how to plan and host your ve...