How to Convert a Regular Closet into a Functional Home Office
How to Convert a Regular Closet into a Functional Home Office
Okay, real talk: My tiny apartment in Portland didn't exactly have room for a dedicated home office. For months, my "workspace" was the kitchen table, which meant I was either eating cereal surrounded by spreadsheets or working on my laptop while trying not to spill coffee on important documents. Sound familiar?
If you're nodding along, I've got a solution that's been a total game-changer for me. We're going to turn that underutilized, dusty closet into a surprisingly functional home office. It's not about fancy renovations; it's about smart, DIY solutions.
Why This Actually Matters
Having a designated space, even a small one, makes a HUGE difference in productivity and mental separation. It's not just about having a place to put your laptop; it's about creating a mental boundary between "work life" and "home life."
I used to find myself drifting between my couch and my bed for work, and honestly, I never felt truly "off." The moment I set up my closet office, it was like a switch flipped. I could actually close the door and leave work behind.
The Tiny Office Concept: Maximizing What You've Got
The core idea here is to take a space that's usually just… there, and give it purpose. Most closets, especially bedroom closets, are just big empty boxes. We're going to fill that box with smart storage and a functional desk area.
Think of it like a really small, really organized studio apartment. Every inch counts, so we're focusing on efficiency and smart design. It doesn't have to be Pinterest-perfect right away; it just has to work for you.
It's All About Vertical Space
Closets are inherently vertical. They've got walls that go all the way up! This is your biggest asset when you're dealing with limited floor space.
We'll be using that vertical real estate for shelves, pegboards, and anything else that gets stuff off the floor and within easy reach. This is where you can really get creative with storage solutions.
Defining Your Workspace
Even though it's a closet, we're going to make it feel like a distinct "office." This means creating a dedicated spot for your computer and work essentials. It's about setting up a zone.
This separation is key for your brain to switch gears. When you're in the closet, you're working. When you step out, you're done.
Storage, Storage, Storage
This is probably the most important part. You need a place for everything – pens, paper, chargers, notebooks, maybe even a few files. Without good storage, that functional office will quickly turn into a cluttered mess.
We'll explore different types of storage that fit the confined space without making it feel like you're working in a shoebox. Think slim, stackable, and wall-mounted.
How To Actually Do It: Step-by-Step
Alright, enough theory. Let's get to the nitty-gritty. This is how I tackled my own closet conversion. I'm going to break it down into manageable steps, and I promise, you don't need to be a master carpenter or have a huge budget.
Step 1: Empty It Out and Assess
First things first: take absolutely everything out of the closet. Every shoe, every forgotten box, every stray sock. You need a blank canvas.
While it's empty, really look at the space. What's the height? How deep is it? Are there any weird pipes or electrical outlets you need to work around? Measure everything. Seriously, measure twice, cut once is a cliché for a reason.
Step 2: Decide on Your Desk Solution
This is where most people get stuck. How do you fit a desk into a closet? There are a few ways to go about it.
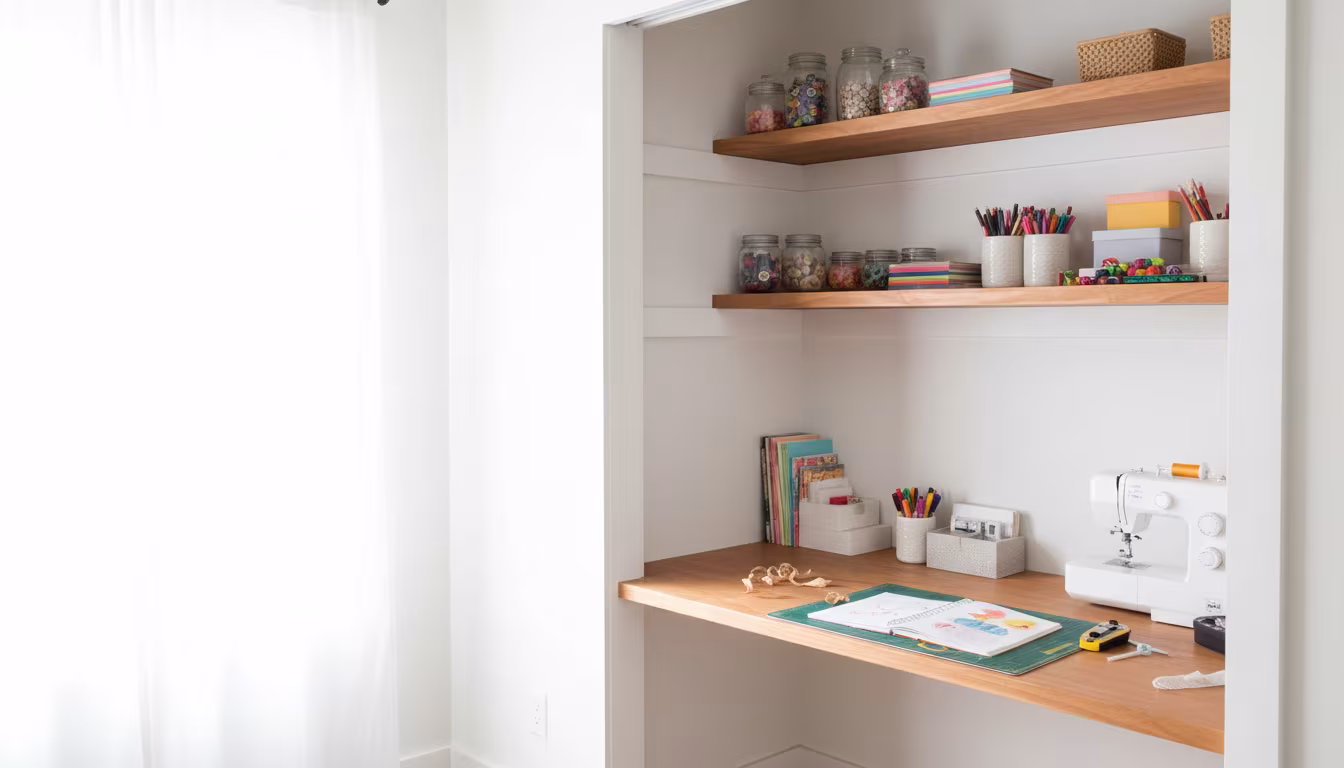
Option A: The Floating Desk. This is what I did. You can buy a simple shelf or even a thick piece of wood and mount it directly to the wall studs at desk height. It takes up minimal space and looks super clean. You'll want it to be deep enough for your laptop and maybe a notebook.
Option B: A Small Pre-Fab Desk. You might be able to find a narrow console table or a small writing desk that fits. Measure your closet's width and depth carefully to see if something like this is feasible.
Option C: A Fold-Down Desk. These are becoming more popular and are great if you want to reclaim the closet space when you're not working. You mount a hinged desk to the wall, and it folds up when not in use.
For a floating desk, I used a sturdy shelf that was about 24 inches deep and 48 inches wide. I made sure to screw it into the wall studs for maximum stability. It's held up my laptop, monitor, and a cup of coffee without a single wobble.
Step 3: Plan Your Shelving and Storage
Once your desk is sorted, it's time to think about storage. You've got the wall space above and beside your desk.
I decided to install a couple of simple, inexpensive shelves above my floating desk for books and important binders. For smaller items like pens, chargers, and office supplies, I went with a pegboard system on one of the side walls. This was a total lifesaver because I could customize it with different hooks and containers.
Don't forget to think about where your computer tower or power strip will go. Sometimes a small shelf underneath the desk or a mount on the wall is a good solution.
Step 4: Lighting is Key
Closets are notoriously dark. Relying on just the overhead room light (if you even have one in there) won't cut it. You need task lighting.
I opted for a small, adjustable LED desk lamp that clips onto the edge of my floating shelf. It’s bright enough for me to see what I'm doing without being overwhelming. You could also consider battery-powered LED strip lights under the shelves for a softer glow.
Make sure whatever lighting you choose is easy to reach and turn on/off. You don't want to be fumbling in the dark every time you need to grab something.
Step 5: Cable Management!
This is the unsung hero of any tidy workspace, especially a tiny one. A nest of cables can make even the most organized closet look messy.
I invested in a few cable ties and some adhesive cable clips. I ran all my cords along the back of the desk and up the wall, securing them with the clips. It makes a huge visual difference and prevents you from tripping over wires.
You can also get a power strip with surge protection and mount it discreetly on the wall or under your desk so you're not hunting for outlets.
Step 6: Personalize and Organize
Now for the fun part! Make it your own. Add a small plant, a piece of art, or a comfortable chair. The goal is to make it a space you actually want to spend time in.
Organize your supplies using drawer inserts, small bins, or jars. Label things if it helps you stay on track. The more organized it is, the less likely you are to let clutter take over.
I found some cute vintage tins at the thrift store for about $2 each to hold my pens and paperclips. It added a bit of personality without costing a fortune.
Step 7: The "Closing the Door" Ritual
This is a mental trick, but it's powerful. Once your workday is done, tidy up your desk and close the closet door. It’s your signal to switch off.
This simple act helps create that crucial boundary. When the door is closed, the work stays inside. This has been a sanity saver for me.
Making It Stick: Common Pitfalls and How to Avoid Them
Okay, so you've got your closet office set up. Awesome! But sometimes, these DIY solutions can start to unravel if you're not careful. Let's talk about what can go wrong and how to keep your tiny workspace functioning long-term.
The biggest mistake isn't a failed DIY project; it's letting the space become a dumping ground again. You have to be intentional about maintaining it.
Clutter Creep
This is probably the #1 enemy of small spaces. It's so easy for random papers, charging cables, and bits and bobs to accumulate. Before you know it, your functional office is a disaster zone.
My strategy for combating clutter creep is a quick 5-minute tidy-up at the end of each workday. Put things back where they belong, toss trash, and deal with any new mail immediately. It sounds simple, but it makes a world of difference.
Lack of Ergonomics
You might have gotten away with working hunched over for a few days, but long-term, it's going to cause problems. Think about your posture.
If your desk is too low, you might need to add risers (even sturdy books can work in a pinch!). If your monitor is too low, get a monitor stand or stack some books. Your neck and back will thank you.
Poor Lighting
I know I mentioned lighting earlier, but it bears repeating. Working in a dim space is not only bad for your eyes but can also make you feel more tired and less motivated.
Make sure your task lighting is adequate. If you're feeling eye strain, consider a brighter bulb or a larger lamp. You can also try painting the interior of the closet a lighter color to reflect more light.
Ignoring Ventilation
This is something I didn't even think about at first, but a small, enclosed space can get stuffy. If your closet is completely sealed, you might want to leave the door open periodically or consider a small battery-operated fan.
Even cracking the door open for an hour can help air out the space and prevent that "closed-in" feeling.
Trying to Do Too Much
It's a closet. It's not going to be a full-blown office with a printer, scanner, and filing cabinets. Accept its limitations and focus on what you can do well.
If you need to print frequently, maybe keep a small printer in another room and bring it to your closet desk when needed. Or, use a print shop for bigger jobs. Don't try to cram too much into too little space.
Frequently Asked Questions
How much does it typically cost to convert a closet into an office?
It really varies depending on what you already have and how elaborate you want to get. I spent around $150 on shelves, a pegboard, a desk lamp, and some cable management supplies. But if you're resourceful and can find used furniture or DIY your desk, you could easily do it for under $100.
Can I do this if my closet doesn't have a door?
Absolutely! The door isn't strictly necessary for functionality. If you have an open closet or a walk-in with no door, you can still create a defined workspace. You might consider adding a curtain or even just visually separating the area with a rug or room divider to create that psychological boundary.
What if my closet is really small?
That's exactly where this idea shines! Smaller closets are often better for this project because they force you to be efficient. Focus on a minimal floating desk, wall-mounted storage, and only keep the absolute essentials in there. The goal is function, not square footage.
How long does this project usually take?
If you're just installing a simple floating desk and a shelf, you could honestly do it in an afternoon, maybe 2-3 hours. If you're adding a pegboard, more extensive shelving, or painting, give yourself a weekend. It’s a project that doesn't require a huge time commitment.
Is this a good idea for someone who works from home full-time?
For full-time remote work, it's a good temporary or supplementary solution, especially if you're in a small living space. However, if you're in the closet office eight hours a day, five days a week, you might eventually crave more space and natural light. It’s fantastic for creating a dedicated zone, but consider it part of a larger home office strategy if you're a full-time remote worker.
The Bottom Line
Turning a closet into a functional home office is totally doable and incredibly rewarding. It’s proof that you don’t need a big house to create a productive workspace.
Start small, focus on the essentials, and don't be afraid to get creative with the space you have. You might be surprised at what you can accomplish!
Related Posts
The Best Way to Weatherproof and Stain an Old Wooden Deck
Is your old wooden deck looking a little worse for wear? We'll show you the easiest, most effecti...
Why Wainscoting Panels Make Plain Hallways Look High-End
Dreaming of a more sophisticated entryway? Learn why wainscoting panels are a game-changer for ma...
How to Build Under-Stair Storage That Maximizes Dead Space
Dreaming of adding some bohemian flair to your home without breaking the bank? We'll show you how...
The Complete Guide to Caulking Baseboards for a Professional Finish
Just unboxed your new Cricut machine and wondering where to start? We'll walk you through the set...