How to Make Custom Wax Seal Stamps for Wedding Invitations
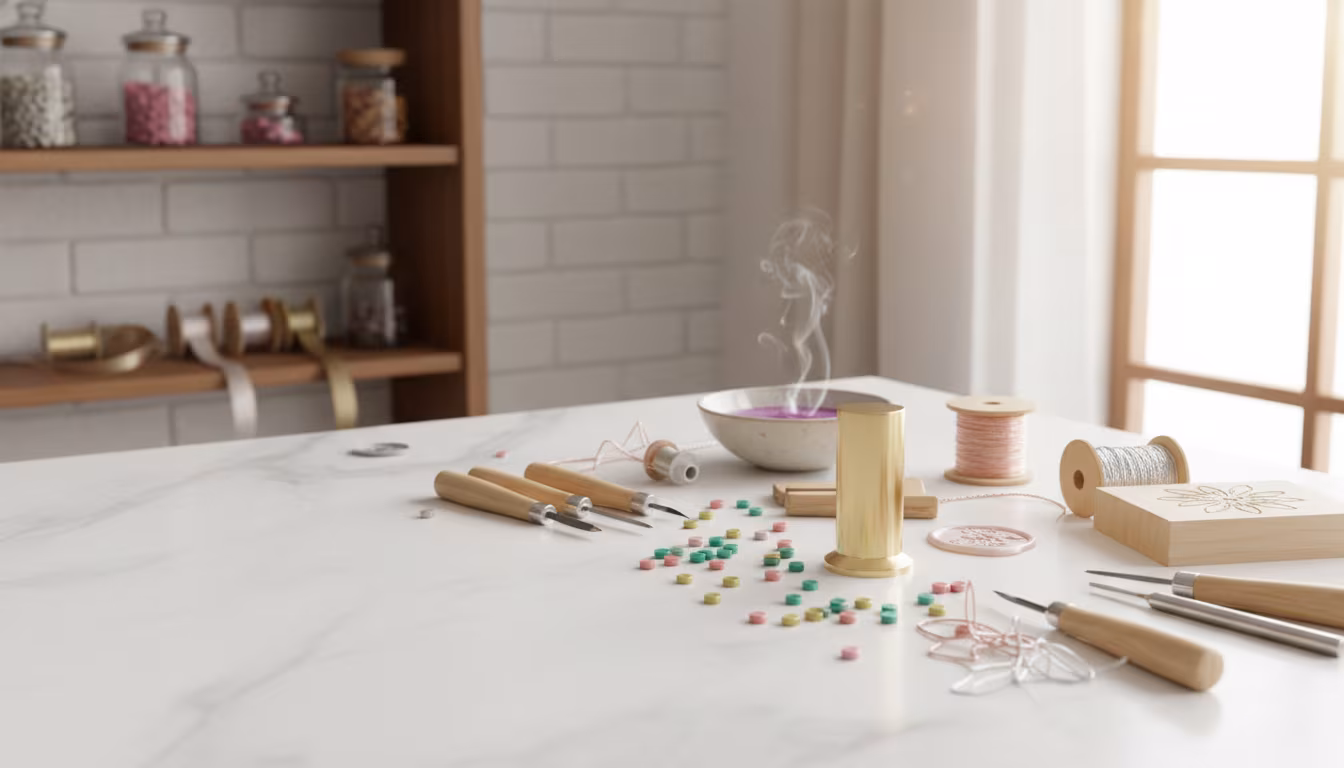
How to Make Custom Wax Seal Stamps for Wedding Invitations
Okay, confession time: I’ve got a Pinterest board that’s 90% wedding inspiration, even though I got married five years ago. And lately, it’s all about those gorgeous, almost impossibly elegant wax seals. You know, the ones that make your wedding invitations look like they were sent from royalty?
I’m Laura, by the way, and if you’re anything like me, you’ve scrolled through those perfect little circles of wax and thought, “Could I actually do that myself?” The good news is, yes, you absolutely can! We’re going to walk through how to make your very own custom wax seal stamps, perfect for wedding invites, fancy thank-you notes, or just making your junk mail look important.
Why This Actually Matters
Look, I get it. Wedding planning can feel like a marathon of tiny decisions. Do you really need custom wax seals? Probably not in the grand scheme of things. But when you’re pouring your heart and soul into creating an event that feels uniquely you, the little details matter.
That personal touch, that little bit of handcrafted magic, is what makes your wedding memorable. It’s the difference between an invitation that gets tossed and one that gets displayed on the fridge. And honestly, the satisfaction of creating something beautiful with your own hands? Priceless.
Understanding the Basics of Wax Seals
So, what exactly is a wax seal stamp? At its core, it’s a stamp designed to be pressed into melted wax, leaving an impression. For centuries, people used them to secure letters and documents, proving authenticity and preventing tampering.
Think of it as a signature, but way cooler. Your stamp can feature your initials, your wedding monogram, a symbol that means something to you as a couple, or even a tiny illustration. It’s a small detail that carries a lot of personal weight.
The Two Main Players: The Stamp and the Wax
You can't have a wax seal without its two essential components: the stamp itself and the wax you'll be melting.
- The Stamp: These can range from basic metal stamps with pre-made designs (like initials or simple flowers) to fully custom creations. We're focusing on making your own custom one today, so we’ll be diving into how to get that unique design onto a stamp.
- The Wax: Wax seals used to be made from actual sealing wax, which is a bit brittle and can crack. Most modern crafting waxes are actually made of a blend of paraffin wax, rosin, and sometimes a bit of pigment. This makes them more flexible and less likely to break when you’re pressing your stamp.
You can buy wax in stick form, which you melt with a lighter or a glue gun, or in bead form, which you melt in a small pot over a gentle heat source. Both work, but the bead form can be a little easier to control for consistent amounts.
How to Actually Make Your Custom Stamp
Alright, here's where the fun really begins. There are a few ways to go about creating a custom stamp, but my favorite for a truly DIY approach involves a bit of carving and a dash of patience.
Step 1: Designing Your Masterpiece
This is where you get to brainstorm! What do you want your seal to say about you and your partner? I spent way too long sketching out different fonts and little doodles with my fiancé. We finally landed on a simple intertwined "L&J" with a tiny sprig of lavender beside it, because lavender is my favorite flower and it felt subtle and elegant.
Think about your wedding theme, your personalities, or inside jokes. Do you love cats? A tiny cat silhouette. Are you super outdoorsy? Maybe a little mountain range. Keep it relatively simple, though; intricate details can be really hard to carve, especially when you’re starting out.
Step 2: Transferring Your Design
Once you have your design finalized on paper, you need to get it onto your stamp material. There are a couple of popular DIY methods for this.
One common way is to print your design in reverse onto a piece of paper. Then, you can use transfer paper or even just rub the back of the printed paper with a pencil to transfer the graphite onto your carving surface. Another method is to use carbon paper to trace your design directly onto your material.
Step 3: Choosing Your Carving Material
This is where you can get creative with the actual "stamp" part. For a budget-friendly, accessible option, I love using linoleum blocks, often called "lino." You can buy these at most craft stores or online, and they’re designed for printmaking, so they carve relatively easily.
You can also use polymer clay that you bake and harden, or even some types of dense craft wood. Linoleum is my go-to because it’s forgiving, and you can get some really nice detail out of it without needing super specialized tools.
Step 4: The Carving Process (Get Your Hands Dirty!)
This is the part that might feel a little intimidating, but remember: it’s okay if it's not perfect on the first try. I definitely had a few wobbly lines on my first attempt.
You’ll need a set of carving tools, often called linoleum cutters. These usually come with different blade shapes – V-shaped blades are great for outlines, and U-shaped blades are good for clearing larger areas. Start by carefully carving along the outlines of your design. Then, use the other blades to remove the material around your design.
The key is that you're removing the parts that you don't want to leave an impression. So, if you're carving initials, you'll carve away the background, leaving the letters raised. Work slowly and steadily, and don't try to take off too much material at once. It’s easier to remove more later than to put it back!
Step 5: Turning Your Carving into a Stamp
Once your design is carved out of the linoleum block, you’ve essentially created a printing plate. Now, how do we make it a stamp you can use with wax?
You have a few options here. You can adhere your carved linoleum block onto a wooden handle or a pre-made stamp base. Many craft stores sell plain wooden stamp bases, or you can even find old wooden blocks at the thrift store and glue your carving onto them with strong craft glue (like E6000). Make sure it’s securely attached!
Another option, if you’re feeling ambitious, is to use polymer clay. Carve your design into a small disc of clay, bake it according to the package instructions until it’s hard, and then use that as your stamp face. You can even embed a small screw or a loop into the clay before baking to create a handle.
Step 6: Testing Your Creation
Before you commit to sealing all your wedding invitations, you absolutely MUST test your stamp. Melt a small amount of wax (we'll get to that in a bit) and pour a small puddle onto a non-stick surface like parchment paper or a silicone mat.
Let the wax cool for just a moment until it’s no longer totally liquid but still pliable. Then, firmly but gently press your custom stamp into the wax. Hold it there for a few seconds to let the design set. Carefully lift the stamp.
Did it transfer well? Are the lines clear? If not, you might need to go back to your carving and refine some areas, removing a little more material or deepening lines. This is the part where you might have to do a few test runs to get it just right. I think I did three tests before I was happy with how my lavender sprig looked.
Making It Stick: Sealing the Deal with Wax
Now that you have your custom stamp ready to go, let’s talk about the actual waxing process. It looks so effortless in those styled photos, but there’s a little technique involved!
Melting the Wax
If you’re using wax sticks, you can melt them directly with a lighter or a small butane torch. Hold the stick over your desired spot (your invitation, envelope, etc.) and gently rotate it, letting the wax drip down. Be careful not to scorch the wax – you want a nice, smooth melt, not a burnt, black mess.
If you're using wax beads, you'll want a small melting pot or even an old metal spoon you don't care about. Place the beads in the pot and heat it gently. You can do this over a small candle flame, a Sterno can, or even in a small electric wax melting pot (which gives you the most control).
The goal is to melt the wax to a smooth, liquid consistency. Don't overheat it, as this can make it brittle.
Pouring the Perfect Puddle
Once your wax is melted, you need to pour the right amount. For a standard 1-inch diameter seal, you’ll probably need about 2-3 tablespoons of melted wax. This will create a nice, even circle when you pour it.
If you're sealing an envelope, hold the flap open and pour the wax directly onto the flap. If you're sealing a card or tag, you might want to pour it onto a piece of parchment paper first and then press the card into the melted wax, or pour directly onto the card where you want the seal.
Try to pour it in a circular motion to create a relatively uniform puddle. This will make pressing your stamp much easier and give you a cleaner result.
The All-Important Stamp Press
Timing is key here. You want to press your stamp into the wax when it’s no longer super hot and liquid, but still soft enough to take an impression. It should look like thick honey.
Gently and firmly press your stamp straight down into the center of the wax puddle. Give it a good 5-10 seconds to cool and harden slightly. Don't twist or wiggle the stamp! That will create smudges and won't give you a clean imprint.
Then, carefully lift the stamp straight up. Voila! You should have your custom design imprinted in the wax.
Common Mistakes and How to Avoid Them
The most common mistake people make? Trying to rush the process. Wax sealing takes a little patience.
- Too much wax: This results in a huge, drippy mess that’s hard to stamp cleanly. Start with less and add more if needed.
- Too little wax: The stamp won't create a full impression, leaving gaps.
- Pressing too soon: The wax is too hot, and the impression will be muddy or distorted.
- Pressing too late: The wax is too cool and hard, and the stamp might stick or not leave a clear mark.
- Wiggling the stamp: Smears galore! Keep it straight and still.
- Not reversing your design for carving: Your raised design will be mirrored.
Honestly, the best way to avoid these is practice. Grab some cheap sealing wax and some scrap paper, and just play around with it. You’ll quickly get a feel for the right amount of wax and the perfect cooling time.
The beauty of a handmade wax seal isn't in its absolute perfection, but in the unique, imperfect imprint of your personal touch.
Frequently Asked Questions
Can I use regular crayons or colored pencils for wax seals?
While you can melt down crayons or colored pencils, it’s generally not recommended for a professional-looking seal. Most crayons and pencils contain fillers and pigments that don't melt smoothly or create brittle results. Dedicated sealing wax is formulated to be flexible and leave a clean impression.
What's the best way to clean my custom stamp if wax gets stuck on it?
If a bit of wax hardens on your stamp, the easiest way to clean it is to gently reheat the stamp. You can do this by holding it briefly over a flame (carefully!) or placing it face down on a warm (not hot) surface. Then, wipe the melted wax away with a soft cloth or paper towel. You can also try gently scraping it with a toothpick or craft knife when it's cool and hardened.
What if I'm not a great artist? Can I still make a custom stamp?
Absolutely! You don't need to be Michelangelo. Simple designs often work best. Think about your initials, a simple geometric shape, or even a silhouette of something you both love. You can also find pre-made stamp bases and just glue your carved design onto them. Or, if you're really not into carving, you can order custom stamps online from places that specialize in them – though that's not quite the DIY route we're going for here!
How long does it take to make one custom stamp?
This really depends on the complexity of your design and your carving experience. For a simple design like initials, if you have all your tools ready, you could potentially carve and mount a stamp in about 2-3 hours. This includes design time, carving, and letting glue dry.
Is this budget-friendly for a large wedding?
Making your own stamps is definitely more budget-friendly than ordering custom-made stamps for every single guest or invitation. The initial investment is in the carving tools and linoleum, which you can reuse for other projects. The wax itself is also relatively inexpensive, especially if you buy it in larger quantities. Compared to the cost of many wedding details, it’s a very accessible way to add a personalized touch.
The Bottom Line
Creating your own custom wax seal stamp is a rewarding DIY project that adds an incredibly personal and elegant touch to your wedding invitations, or any correspondence! Don't be afraid of a little carving or a few practice runs; the process is part of the charm.
So, gather your supplies, sketch out your ideas, and get ready to make your mark. You’ve got this! 👋
Related Posts
Acrylic Pouring Cells: Why They Form and How to Control
Cells in acrylic pouring come from density and surface tension differences. Understand the chemis...
How to Block a Knitted Wool Sweater Without Felting
The blocking routine that opens stitches and sets the shape without turning your wool sweater int...
Resin Doming Without Bubbles: A Calm, Reliable Method
A repeatable doming routine that keeps bubbles out and the dome tidy — pour technique, heat metho...
Why Quilling Earrings Are the Most Profitable Craft to Sell Online
Thinking about starting a craft business? You might be surprised to learn that delicate, colorful...