Why Beeswax and Mineral Oil Are the Safest Wood Finishes for Food
For anything that touches food — cutting boards, wooden spoons, salad bowls, rolling pins — the safest finish is a combination of food-grade mineral oil and beeswax. Both are non-toxic, food-contact-safe, and require no solvents. Mineral oil penetrates and conditions the wood so it does not dry and crack; beeswax sits on top as a water-repellent barrier. Neither goes rancid, unlike cooking oils, and neither introduces the chemicals that film-forming finishes like polyurethane and lacquer can leave behind.
Why Conventional Finishes Are a Problem on Kitchenware
Most off-the-shelf wood finishes — polyurethane, lacquer, spar varnish — cure into a hard film and contain volatile organic compounds (VOCs) and other solvents that are not intended for ingestion. They perform well on furniture and floors, but a cutting board is a hostile environment for a film finish: it gets wet, scrubbed, scored by knives, and exposed to hot pans and acidic food juices. Those conditions break the film down at the surface over time, and a cracked or worn film is both a hygiene problem (moisture and bacteria get under it) and a contamination path.
A "food safe" label deserves a careful read, too. It usually means the product is inert only after it has fully cured, under specific conditions, and not necessarily rated for repeated direct food contact and daily washing. The simpler route is to choose a finish that is inherently non-toxic — one made from ingredients safe even if a trace ends up in your food. That is exactly what mineral oil and beeswax offer.
Why Mineral Oil and Beeswax Work
These two materials solve different halves of the same problem, which is why they are used together rather than alone.
Food-grade mineral oil is a highly refined, purified petroleum product — odorless, tasteless, and the same USP-grade material sold as a laxative. Unlike a drying oil, it never polymerizes or hardens; it stays liquid and soaks deep into the wood, keeping the fibers supple and displacing the air spaces where water would otherwise sit. That penetration is what prevents the checking and cracking that ruin a board left dry through a winter of low indoor humidity.
Beeswax, a natural wax secreted by honeybees, does the opposite job — it stays on the surface. Blended with mineral oil and buffed on, it fills the outermost pores and leaves a thin hydrophobic layer that makes water bead, resists food staining, and gives the wood a low satin sheen with a smooth hand feel. On its own beeswax would wear off quickly and mineral oil alone would offer little water resistance, but the two in sequence create a conditioned core protected by a repellent skin.
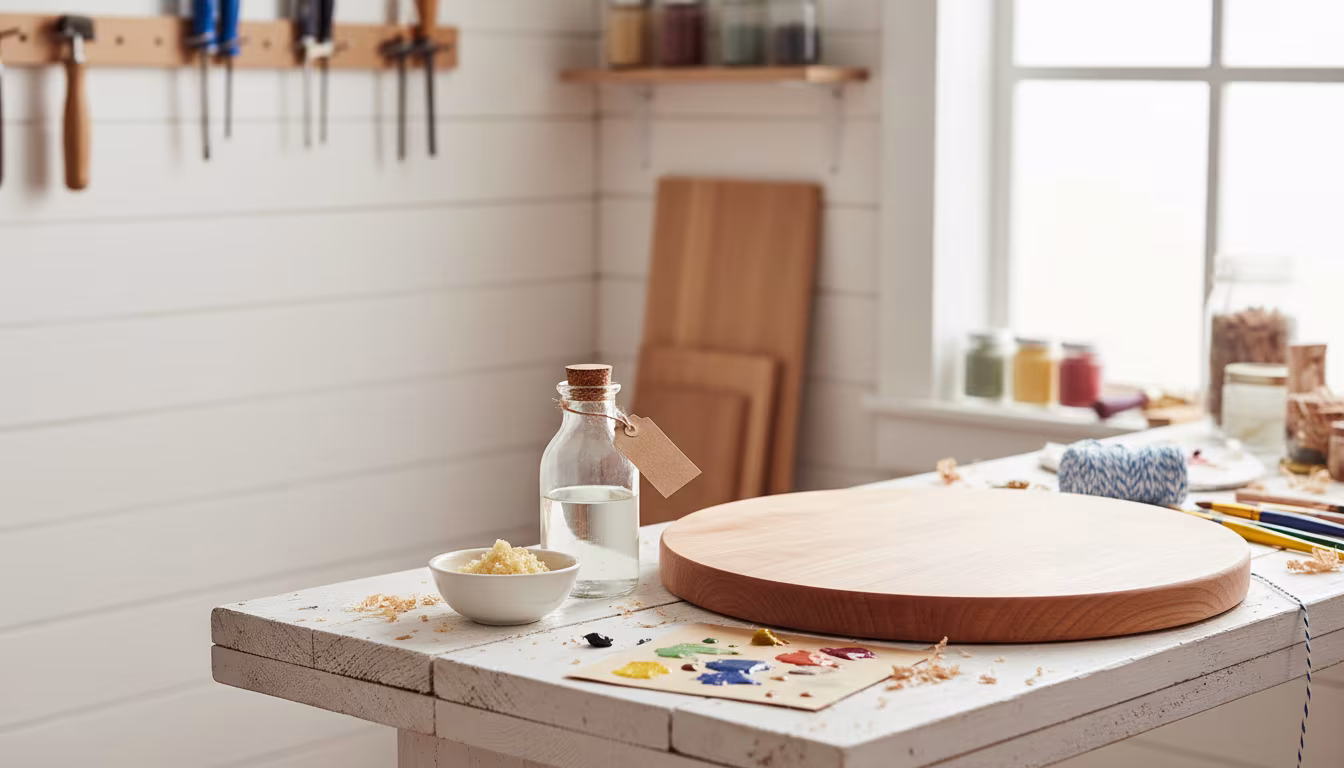
Making Your Own Board Butter
The beeswax step uses a blend commonly called "board butter" — a paste of mineral oil and beeswax. You can buy it pre-made, but mixing your own is cheaper and takes minutes. A standard, easy-to-remember ratio is roughly 4 parts food-grade mineral oil to 1 part beeswax by weight for a soft, spreadable paste; a 1-to-1 ratio produces a harder, more protective wax if you want more surface durability.
Melt the beeswax pellets and mineral oil together gently — a double boiler over low heat, or a microwave-safe bowl in 20-to-30-second bursts, stirring between each. Beeswax melts around 62–64 °C (145–147 °F), so it does not take much heat; overheating wax is a fire risk, so go slow. Pour the warm liquid into a clean jar and let it set to an opaque paste at room temperature. Stored sealed, it keeps for a year or more. A pinch of carnauba wax added to the melt raises the hardness and gloss if you want a tougher finish, though it is optional.
Applying the Finish Step by Step
The full process — sand, oil, wait, wipe, wax, buff — takes an evening of mostly hands-off waiting.
- Prepare the wood. The item must be clean and fully dry. On a new piece, sand progressively through 120 grit, then 220 grit, until the surface is smooth. On an older piece, scrub with mild dish soap and water and let it air-dry at least 24 hours. For a raised-grain board, a light misting with water followed by a 220-grit knock-down before oiling gives the smoothest result.
- Apply the mineral oil. Using a clean lint-free cloth, flood the surface with food-grade mineral oil, covering every face and edge. End grain drinks the most, so give the ends extra. The wood will darken as it absorbs.
- Let it soak. Allow 20–30 minutes minimum; for very dry wood, leave it several hours or overnight. If dry patches reappear as the oil sinks in, the wood is still thirsty — add more until it stops absorbing.
- Wipe off the excess. With a clean dry cloth, remove any oil still sitting on the surface. The board should feel smooth and lightly conditioned, not wet or sticky. Skipping this leaves a tacky, dust-grabbing film.
- Apply the board butter. Rub a thin layer of the beeswax paste over the oiled surface with a cloth, working in circular motions. Use it sparingly — a little builds quickly.
- Buff. Buff with a clean cloth until you reach a smooth satin sheen. It should not look thick or greasy; you are polishing, not coating.
- Cure (optional). For high-wear items, let the wax firm up for a few hours or overnight before use so it hardens into a more durable barrier. For a lightly used spoon, next-day use is fine.
Which Woods Take This Finish Best
The finish works on essentially any bare hardwood, but some species pair with it better than others for food use. Close-grained hardwoods — hard maple, cherry, walnut, and beech — are the classic cutting-board and utensil woods because their tight pores resist harboring bacteria and take oil evenly. Hard maple in particular is the industry standard for butcher blocks. Oilier tropical species like teak have natural water resistance and need less frequent re-oiling, though they can be slower to absorb mineral oil at first.
Softwoods such as pine and fir are poor choices for cutting surfaces: they dent under a knife, and their open grain traps food and moisture no matter how well finished. They are fine for purely decorative wooden items that will not be cut on. Whatever the species, end grain drinks far more oil than face grain, so end-grain boards and the cut ends of spoons need extra passes during the first oiling before they stop absorbing.
Reapplication and How Often
This is a maintenance finish, not a permanent seal — that is the trade-off for its safety. How often you re-oil depends on use. A cutting board in daily service typically wants fresh oil and wax about once a month; a decorative bowl or an occasional-use spoon may go several months. The wood tells you when: it looks dull or grey, feels rougher, or water stops beading and starts soaking in. When any of those show up, repeat the oil-and-wax cycle. A common shorthand is "once a day for a week, once a week for a month, once a month forever" for a brand-new board, tapering the frequency as the wood reaches saturation.
Cleaning Finished Wood the Right Way
Never put an oiled-and-waxed wooden item in the dishwasher. The sustained heat and prolonged soak strip the finish and can warp or crack the wood outright. Hand-wash with warm water and a mild dish soap, dry immediately with a towel, and stand the piece on edge to air-dry fully before storing flat. Storing a still-damp board flat traps moisture on one face and invites warping. For odors or light stains, a scrub with coarse salt and half a lemon lifts most of it; re-oil afterward, since the salt-and-acid scrub removes some of the wax.
What Not to Use
Two mistakes are worth calling out because they are common and they matter. First, do not substitute cooking oils. Olive, vegetable, walnut, and other kitchen oils are not stable — they oxidize and go rancid, leaving the wood smelling sour and developing sticky patches. Food-grade mineral oil is inert and inexpensive; stick with it. (Genuine drying oils like pure tung oil or polymerized linseed do cure hard and are used by some woodworkers on food surfaces, but they demand long cure times and careful sourcing, and they are a different system from the mineral-oil-and-wax method here.)
Second, this finish is for raw, unfinished wood only. It cannot penetrate paint or an existing film finish, so on a painted or stained piece it simply sits on top and does little. If a wooden item is already painted, confirm that coating is itself rated for food contact rather than layering oil over it.
Answers to Common Questions
What grade of mineral oil? Only food-grade (USP) mineral oil. It is sold in the laxative aisle of most pharmacies and in kitchen-supply shops. The label should read "food grade" or "USP."
My board looks parched and grey — is it too far gone? Almost never. Deeply dry wood just needs a long, generous soak: flood it with mineral oil, leave it several hours or overnight, and repeat until it stops drinking before you wax. Knife scars can be sanded out and the piece refinished.
How long will a board last with this care? With consistent monthly re-oiling, a solid hardwood cutting board can last decades. It will collect knife marks, but sanding and re-oiling brings it back.
To put it to use: take the driest wooden spoon or the neglected board in your drawer, sand it to 220 grit, flood it with food-grade mineral oil overnight, wipe the excess, then buff on a thin coat of the 4-to-1 board butter. That single cycle is enough to revive it, and repeating it once a month is all the upkeep the piece will ever need.
Related Posts
Beginner Cricut Blade Set: What You Actually Use Daily
The Cricut starter blade list is longer than most beginners need. The two or three blades that...
Painter's Tape for Crisp Lines on Textured Wall Surfaces
Standard blue tape bleeds on textured walls. The specialty tapes, caulk-edge-seal step, and...
Hot Glue Sticks Compared: Low-Temp, High-Temp, Specialty
Low-temp glue sticks melt near 250°F, high-temp near 380°F. Compare stick types, specialty...

Sandpaper Grits Demystified: When to Stop Going Finer
Sand 80 to 120 to 180 for film finishes, 220 for oil, and stop there: finer burnishes wood and...